Interface
I designed interface so it allows to view as many library items at once as possible (on the right hand side - the "Display") and to have all needed options accessible via the context menu.
On the left hand side you can browse the library you've set up ("Library Tab"), all drives that are connected to your PC ("Explorer Tab") or to change the settings (this includes setting up the library).
On the bottom you can also set a filter that the file names of the displayed items have to match.
The Display
The Display shows the items (Poser files liike Camera, Character,...) as Poser's Library does. But it is not limited to display one type of file at a time (i.e. only Pose files). You can control that and more via the context menu (right click):
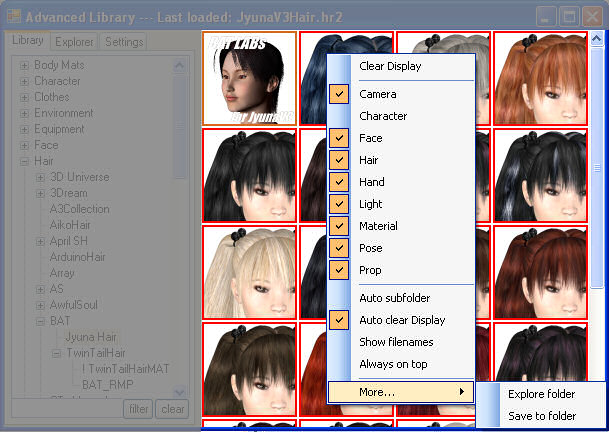
| Clear Display | Removes all items from the Display |
|---|---|
| Camera, Character,... | Quite obvious. Here you can toggle the items you want to have displayed on and off |
| Auto subfolder | Shows the items of all subfolders on the Display whenever you click on a folder (works recursively) |
| Auto clear Display | Removes all items from the Display whenever you select another folder. When switched off, you'll collect all items from the folders you visit on the Display |
| Show filenames | Shows filenames below the items on the Display (the number of lines for the filenames can be changed in the options.) |
| Always on top | Keeps the Advanced Library Window on top of all other windows |
| Explore folder | Opens the folder the item you right clicked at with Window's Explorer. |
| Save to folder | Uses the PRPC Python script to save to the folder the item you right clicked at is in |
The following also applies to the Display:
- Hovering over an image will reveal the filename and additional path information
- You can scroll one row of the Display up and down using the mouse wheel
- You can scroll one screen of the Display up and down while holding SHIFT pressed and using the mouse wheel
- Single clicking an image will select the folder the item resides in in the browser
- Double clicking an image will load it into Poser - you need to have the PRPC running for it to work
- You can use the cursor keys to move the selection around. Enter acts as single click, the space bar as double click does. You can also use Page up/down, Pos 1, End to move around.
- If you run into a MAT Pose file that doesn't work with Poser 6, hold SHIFT pressed while double clicking - AL will then load the MAT Pose as a Material Collection
- AL will only display PNGs, not RSRs - these will show up as blank images. A separate RSR Converter with some limitations is available.
Library Tab
You'll probably use the Library Tab the most often. Here you're presented with the view on Poser's Library that you defined on the Settings Tab.
While navigating the Library's tree view, you have access to the following options via the context menu (right click):
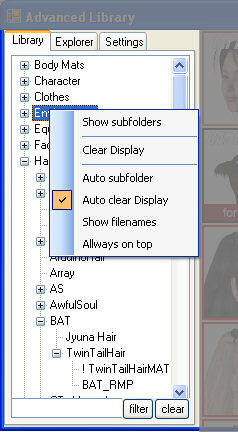
| Show subfolders | Displays the content of all folders which are below this folder in the hierarchy (and their children and the children of the children and so on) |
|---|---|
| Clear display | Removes all items from the "Display" |
| Auto subfolder | Shows the items of all subfolders on the Display whenever you click on a folder (works recursively) |
| Auto clear Display | Removes all items from the Display whenever you select an other folder. When switched off, you'll collect all items from the folders you visit in the Display |
| Show filenames | Shows filenames below the items in the Display |
| Always on top | Keeps the Advanced Library Window on top of all other windows |
On the bottom of the tab you'll find the filter textbox. Enter some text and hit return or press the "filter" button and only files where the filenames contain the text you entered are displayed. Use the "clear" button to reset the filter.
Explorer Tab
This is a simple Windows Explorer like browser which allows you to select Poser files on any drive attached to your PC. All Poser Files from the selected folder are shown on the Display.
The context menu only offers "Add to Library". This is for setup purposes and will add the selected Entry to the currently selected "Category" on the Settings Tab. You can do this easier with Windows Explorer, though.
Settings Tab
Via the "Settings Tab" you have access to the About and Options Dialogs and you can setup and synchronize AL's library.
Setup
How you can do the setup is described in Simple Setup and why you can use this to define your own categories should become clear from the Advanced Setup page.
Options
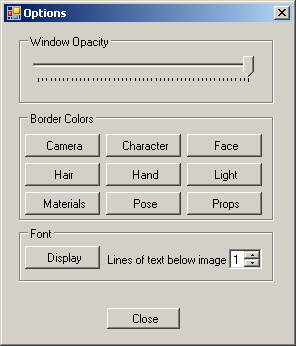
Here you can choose the colors for the different Poser files and you can also set the opacity/transparency for AL's window.
If you like filenames displayed below your images you can also set the font and how many lines of text should be used.
You can also change the size of the borders around the images in the display and the spacing between them.
Any changes take effect imediately.